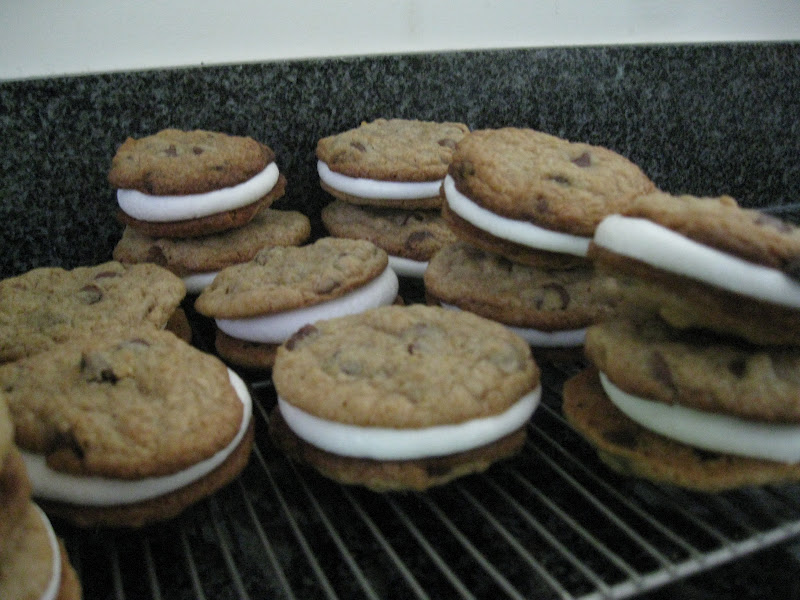
Gwyn picked these out, and it was a great choice! I really liked them, they were well received. Pretty standard cookie recipe, but great tasting.
Chocolate Maple Cookies
4 dozen
1 1/4 cup shortening
1 1/2 cup brown sugar
5 eggs
1 teaspoon vanilla
1/2 teaspoon maple extract
2 1/2 cups flour
3/4 teaspoon baking soda
1/2 teaspoon salt
Frosting:
2 squares (1 oz each) Semisweet Baking Chocolate
1 tablespoon melted butter
1 1/2 cup powdered sugar
1/4 cup milk
Preheat oven to 350.
Cream together shortening and sugar. Once creamy texture is achieved, beat in one egg at a time, mixing well each time. Beat in vanilla and maple.
In a separate bowl, mix together flour, baking soda and salt. Slowly add
this to the creamed mixture. Mix all of this well in to a smooth dough.
Grease a cookie sheet and drop dough with a spoons with room to spread
out. I chose to make them smaller to increase the yield, but you could
make these huge cookies and they would work out. Bake for 8-10 minutes,
or until the edges get dark. The cookies are brown to begin with, so you
will have to watch them.
Remove to rack to cool.
Prepare frosting by melting chocolate and butter together (you can do
this with great effort in a double boiler... or you can use a
microwave). Add sugar and milk, mixing well. If frosting is too thick
add a little more milk, mix well. If too fluid, add more powdered sugar,
mix well. Frost all of the cookies.
Enjoy!
After tearing it up (and loving it) in Pittsburgh, this Spokane Boy moved to Boston to work for a great research company. This is his continuing story of food, friends, celebration, and awesome fun.
Showing posts with label recipe. Show all posts
Tuesday, September 11, 2012
Wednesday, September 5, 2012
S'more Cookies Please!
I am not 100% sure why I craved marshmallows. But I did. And I needed an excuse to buy some. These cookies filled the need. And they turned out great.
S'more Sandwich Cookies
Makes 2 dozen
3/4 cup butter
1/2 cup sugar
1/2 cup brown sugar
1 Egg
2 tablespoons milk
1 teaspoon vanilla
1 1/4 cup flour
1 1/4 cup graham cracker crumbs
1/2 teaspoon baking soda
1/4 teaspoon salt
1/8 teaspoon cinnamon
2 cups (12 oz) semi sweet chips
24-28 Large Marshmallows
Get your oven ready for greatness by pre-heating to 375.
Cream together the butter and both sugars. Once well incorporated, mix in egg. Beat in milk and vanilla. Get this to a nice creamy consistency.
In a different bowl, mix together flour, graham cracker, baking soda, salt and cinnamon. Slowly add dry mix to the creamy mixture, mixing well in between additions.
Once a nice doughy consistency is reached fold in chocolate chips. Mix it up.
Lightly grease your cookie sheets, and drop spoonfuls of dough on to
sheet. Try to keep these little mounds small. I made them large... I
ended up with fewer cookies. But they were big! These are drop cookies,
they will spread out a little as you bake them, so give them some room.
Bake for 8-10 minutes, or until the edges brown. Remove to rack and let cool.
After cooling has happened, place a few on a plate, and place a marshmallow in the center. You want to put the flat part of the marshmallow down (or up.... marshmallows are cylinders, and symmetric at that). Microwave, on high, for 10-15 seconds or until 2 or 3 of them start to get noticeably larger. Quickly remove from the microwave squish another cookie on top to form the sandwich. Be sure to apply even pressure. Put back on rack to cool and set.
Share with hungry people.
S'more Sandwich Cookies
Makes 2 dozen
3/4 cup butter
1/2 cup sugar
1/2 cup brown sugar
1 Egg
2 tablespoons milk
1 teaspoon vanilla
1 1/4 cup flour
1 1/4 cup graham cracker crumbs
1/2 teaspoon baking soda
1/4 teaspoon salt
1/8 teaspoon cinnamon
2 cups (12 oz) semi sweet chips
24-28 Large Marshmallows
Get your oven ready for greatness by pre-heating to 375.
Cream together the butter and both sugars. Once well incorporated, mix in egg. Beat in milk and vanilla. Get this to a nice creamy consistency.
In a different bowl, mix together flour, graham cracker, baking soda, salt and cinnamon. Slowly add dry mix to the creamy mixture, mixing well in between additions.
Once a nice doughy consistency is reached fold in chocolate chips. Mix it up.
Bake for 8-10 minutes, or until the edges brown. Remove to rack and let cool.
Share with hungry people.
| Leaning tower of greatness... |
Tuesday, September 4, 2012
Vanilla Glazed Apple Cookies
There was a request at work to make a fruit themed cookie. I thought that apples would be an interesting experiment, and low and behold, my cookie book had a apple recipe. So again, this comes from my cookie cook book.
Vanilla Glazed Apple Cookies
Makes ~ 2 dozen
1/2 cup shortening
1 1/3 cup brown sugar
1 egg
1/4 cup milk
2 cups flour
1 tsp baking soda
1 tsp ground nutmeg
1 tsp ground cinnamon
1/2 tsp ground cloves
1 cup chopped walnuts
1 cup finely diced and peeled apples (peel then dice, it is easier that way)
1 cup raisins (optional)
Glaze:
1 1/2 cup powdered sugar
1 tablespoon melted butter
1/2 teaspoon vanilla
1/8 teaspoon salt
2-4 teaspoon milk
This is pretty standard cookie business. Just add apples at the end.
So pre heat oven to 400 degrees.
Cream shortening and brown sugar together. Beat in egg, then beat in milk. Mix until incorporated.
In a different bowl, mix together dry ingredients. Then slowly beat in to creamed mixture forming the dough.
Stir in apples, nuts and raisins.
Plop out teaspoon fulls on ungreased cookie sheet. These are drop cookies, they will settle a little, so give some space. Bake for 8-10 minutes, or until brown on the bottom and done on the edges.
Remove and cool on a rack.
Once cool, mix glaze. If glaze is too thick add some milk. If it is too liquidy, add some sugar. Frost each cookie.
Enjoy.
To be honest, I was not a huge fan. The apple taste did not really come through, and the other flavors were muted. Oh well. It just made me excited about pumpkin cookies!
Vanilla Glazed Apple Cookies
Makes ~ 2 dozen
1/2 cup shortening
1 1/3 cup brown sugar
1 egg
1/4 cup milk
2 cups flour
1 tsp baking soda
1 tsp ground nutmeg
1 tsp ground cinnamon
1/2 tsp ground cloves
1 cup chopped walnuts
1 cup finely diced and peeled apples (peel then dice, it is easier that way)
1 cup raisins (optional)
Glaze:
1 1/2 cup powdered sugar
1 tablespoon melted butter
1/2 teaspoon vanilla
1/8 teaspoon salt
2-4 teaspoon milk
This is pretty standard cookie business. Just add apples at the end.
So pre heat oven to 400 degrees.
Cream shortening and brown sugar together. Beat in egg, then beat in milk. Mix until incorporated.
In a different bowl, mix together dry ingredients. Then slowly beat in to creamed mixture forming the dough.
Stir in apples, nuts and raisins.
Plop out teaspoon fulls on ungreased cookie sheet. These are drop cookies, they will settle a little, so give some space. Bake for 8-10 minutes, or until brown on the bottom and done on the edges.
Remove and cool on a rack.
Once cool, mix glaze. If glaze is too thick add some milk. If it is too liquidy, add some sugar. Frost each cookie.
Enjoy.
To be honest, I was not a huge fan. The apple taste did not really come through, and the other flavors were muted. Oh well. It just made me excited about pumpkin cookies!
Friday, August 10, 2012
Zucchini + Squash = Greatness
Ben recently acquired a large quantity of rather large zucchini and summer squash. By large I mean many and huge, respectively. All of them were larger than my forearm. And he gave me 7 of them. Later that week Gwyn and I were going to go to a church BBQ, and needed to bring something to feed other people. I figured this was a great opportunity. Some people might be saying: "Hey Scott! This one time so-and-so made really good grilled zucchini" and "Ooohh... Lots of zucchini? You should make zucchini bread!" While I do like both of those options, I decided to go for a different approach, ever since making sweet potato pancakes with Chelsea, I have wanted to experiment with more ( <item> + eggs + breadcrumbs ) -> butter + heat = pancake like goodness.
Forewarning, I am inheriting my mother's cooking technique: you don't need to measure anything, you will just know. While this may be true for people who have done this, it can cause trouble for others, like my roommate (but I am not saying any names, and she gets a post after this one on one of her cooking achievements)
Summer Time Squash Pancakes
3-4 Home Grown Monstahs (that being Larger than normal home grown squash)
or
5-7 store bought squash
for both of these you can mix and match summer squash and zucchini, if you like one more than the other, focus on that one.
2-3 cups bread crumbs
2-4 eggs
1-2 tablespoons Italian seasoning (kind of optimal, you need something here... it could be any seasoning you prefer)
Milk and Flour as needed (I used about 1 cup of flour)
Butter. Lots of Butter. Or Oil if you would rather.
Sauces to dip in.
Wash your squash, cut off the ends (the stem and the nub on the other end) and start grating. Use a large cheese grater, or similar interment, and shred all of the squash you are using. This activity can take a while, and it is very dangerous for your knuckles. You have been warned.
Once your squash is all cut up, you need to get as much water out as you can. I grated mine in to a big bowl, then pressed the squash, and drained, then pressed and drained. I got my hands dirty, but I am sure there is some graceful way to do this. You just want to get rid of the juice.
At this point, I went to sleep and worked on it the next day.
Drain again, add the egg, bread crumbs and seasoning. Mix well. You are looking for a sweet spot in consistency, you want to be able to ball up the batter and have it kind of hold shape, but you don't want it so doughy that it is super sticky. Eggs and/or milk to make it more liquidy. Add more bread crumbs or flour to stiffen it up. This is kind of an on going process, as you start to cook them you will see what kind of consistency you are looking for.
| Squished Squash (and some other stuff) |
| From here they look like Sausages |
| Presentation is everything |
| Be sure to put this on your favorite plate. |
Friday, July 6, 2012
Chocolate Chocolate Chip Chocolate Mint Chocolate Cookie
| Mint and Basil. Rocking the window. |
This turned out great! And the mint is still really aggressive, trying to grow in to the window glass... or the drywall... or another pot that I put next to it (I now have two plants!). Needless to say I had to find a good way to use all of this mint, Gwyn made some mint lemonade, and we added some mint to our coffee, but still I was growing faster than we could use it.
I decided to modify a chocolate chocolate chip cookie recipe to be a vessel for the mint. The cookie revived the mint very nicely, possibly one of my personal favorites from the Sunday cookies. So if you have a overzealous mint plant, this is the right thing to do with it.
Chocolate Chocolate Chip Chocolate Mint Chocolate Cookie
1 cup soft butter
1 cup packed Brown Sugar
1 cup sugar
2 eggs
1 teaspoon Vanilla
2 cups flour
3/4 cup cocoa powder
1 teaspoon Baking Soda
1/2 teaspoon salt
2 Cups Chocolate chips (8 oz by volume, I just used a bag)
2 cups Fresh Mint (3-6 sprigs, 18 - 40 quarter sized leaves)
Prep Time: 25 minutes
Bake Time: 12 Minutes
Pre Heat oven to 350
Cream the sugar, brown sugar and butter to a nice soft consistency. Beat in the eggs and vanilla until well mixed.
| Gwyn helped me out on this adventure! |
Finely chop mint leaves, the finer the better. Add chopped mint and chocolate chips to dough, fold until well incorporated.
| Go from this... |
| ...to This! |
| Mmmmm.... |
Enjoy the lovely mint overtones with a great chocolate cookie.
Snickerdoodles
These are a family favorite, as Gramps cannot have Chocolate, my mom would make these all the time. A wonderful use for cream of tartar and a good solid cookie.
Snickerdoodles
1/2 cup butter
1/2 cup shortening
1 1/2 cup sugar
2 eggs
2 1/2 - 2 3/4 cups flour
2 teaspoons Cream of Tartar
1 teaspoon Baking Soda
1/4 teaspoon salt
+ Cinnamon Sugar to coat
Prep Time: 15 minutes
Cook Time: 8-10 minutes per batch
Pre Heat Oven to 400 Degrees
Follow the cookie pattern: cream butter, shortening and sugar until well mixed. Beat in the two eggs, keep mixing until well blended.
In a separate bowl mix together the dry ingredients (Flour, CoT, Baking Soda, Salt). Slowly add to sugar mixture. Keep folding/mixing until well mixed and soft looking.
Pour cinnamon sugar on to a plate. Take spoon full of dough, roll in to ball and then roll around in the sugar, getting it well coated. Place on ungreased nonstick cookie sheet.
Bake for 8-10 minutes at 400 degrees. You want the bottoms to be brown, but the tops to be light. Remove from pan, let cool.
| Wish you were here Gramps! |
Tuesday, June 19, 2012
Strawberry Shortcake Cake Shortcake
Last week was Marissa's birthday, and she requested a cake with strawberries involved. I didn't really want to make sweet rolls and do shortcake, as that seems too easy. Also it is hard to serve that at work. It is also hard to make in to a big letter M! So I did some looking around and found this recipe that based this cake on. Thanks Ree.
Strawberry Shortcake Cake Shortcake
prep time: 2 hours
cook time: 2 hours
serves: 15-20 depending on if Marissa is eating half of it or not.
Cake:
These are for one single cake. See notes below.
1 1/2 cup Flour
3 Tablespoons Cornstarch
1/2 teaspoon salt
1 teaspoon Baking Soda
1/2 cup Unsalted Butter (soft)
1 1/2 cup sugar
3 Eggs
1/2 cup Sour Cream
1 teaspoon Vanilla
----------------------------------------------------------
Whole Shebang:
2 Cakes
Topping:
1+ pound of Strawberries (as fresh as you can get, this means frozen is ok...)
A few handfuls of sugar
Icing:
1 cup Unsalted Butter (soft)
1 1/2 pound Powdered Sugar
1 teaspoon Vanilla
1/2 pound Cream Cheese (soft)
So I made two of these cakes in a 9 x 13 inch pyrex dish, giving me two 3/4 inch thick cake. You can use this recipe in a smaller pan, and then slice the cake in half if you would rather. But to be clear, the above ingredient list is for one single cake. I made two cakes, in two different runs, but if you have a large enough blender, you could just double the recipe.
Preheat to: 350 degrees
To start out making a cake, cream the butter and the sugar until well mixed, creamed you might say. Then add the eggs one at a time, mixing well each time. Once thoroughly mixed add sour cream and vanilla. In a separate bowl, mix remaining dry ingredients. Slowly add dry mix in to wet mix. Blend until well incorporated.
Grease the heck out of your cake pan. I used a pyrex dish, but you could use traditional cake pans, or other interments. If you are worried about sticking, you can throw down some parchment paper. Pour the batter in to the pan. Evenly spread out the batter, this is not as liquid-y as most cake batters, and it needs to be evened out.
Throw it in the oven for 40-50 minutes. This cake is going to brown and get crispy on the outside. It is ok if it is brown. Don't go for black, but a healthy brown color is great. Remove the cake from the oven let cool for a little bit, and remove to rack to continue cooling.
While your cake is baking you can prepare your strawberries and filling. Wash the berries, remove the stems, cut in to quarter pieces. Put the berries in to a large bowl. Add a handful of sugar, toss the berries around for a bit. Let this sit. As it sits the cut berries will let out some juice, this will then mix with the sugar making a nice syrup. After a little mash up the berries with a fork or potato masher. You need to break the berry down a but, not puree it. Add another handful of sugar. Let this sit for some more time. When I say sit, I mean 20-50 minutes, you want them to let off as much water as you can.
In a mixer cream together the cream cheese, butter and vanilla. Once well mixed add some powdered sugar, not all of it though. Mix well. If the frosting is to liquidy, add some more sugar. If the frosting is too thick add some milk. Whenever you add anything make sure to mix everything really well. It is easy to go too far in one direction. Once you get the right consistency, put the frosting in the fridge.
By this point everything should be done, and cool. Transfer one cake to your serving tray. Poke a bunch of holes in the cake with a fork, this will aid in getting the strawberry juice soaked in to the cake. If you are cutting a cake in half, just make sure to have the raw cake side up. Spoon out half of the strawberries, with syrup on to the cake. Spread out evenly. Apply a decent layer of frosting. Just enough to cover the berries.
Add the second cake, and repeat with poking the top with a fork, adding strawberries, and a layer of frosting. This time be careful as this will be the final covering. Continue to frost around the edges. You are looking to cover, and encase the berries in the frosting, but it is ok to have some poking out.
You are now ready to enjoy!
I was going to cut this one in to an M, but it was about 10:30PM when I got the top layer done. With frosting running low and patience thin, I just finished the side frosting and called it good. This meant that there was plenty of extra cake.
It was really well received. Marissa loved it, all of my coworkers said it was the best thing I have made yet. Dang... I can't use box cake mixes anymore....
Strawberry Shortcake Cake Shortcake
prep time: 2 hours
cook time: 2 hours
serves: 15-20 depending on if Marissa is eating half of it or not.
Cake:
These are for one single cake. See notes below.
1 1/2 cup Flour
3 Tablespoons Cornstarch
1/2 teaspoon salt
1 teaspoon Baking Soda
1/2 cup Unsalted Butter (soft)
1 1/2 cup sugar
3 Eggs
1/2 cup Sour Cream
1 teaspoon Vanilla
----------------------------------------------------------
Whole Shebang:
2 Cakes
Topping:
1+ pound of Strawberries (as fresh as you can get, this means frozen is ok...)
A few handfuls of sugar
Icing:
1 cup Unsalted Butter (soft)
1 1/2 pound Powdered Sugar
1 teaspoon Vanilla
1/2 pound Cream Cheese (soft)
So I made two of these cakes in a 9 x 13 inch pyrex dish, giving me two 3/4 inch thick cake. You can use this recipe in a smaller pan, and then slice the cake in half if you would rather. But to be clear, the above ingredient list is for one single cake. I made two cakes, in two different runs, but if you have a large enough blender, you could just double the recipe.
Preheat to: 350 degrees
To start out making a cake, cream the butter and the sugar until well mixed, creamed you might say. Then add the eggs one at a time, mixing well each time. Once thoroughly mixed add sour cream and vanilla. In a separate bowl, mix remaining dry ingredients. Slowly add dry mix in to wet mix. Blend until well incorporated.
Grease the heck out of your cake pan. I used a pyrex dish, but you could use traditional cake pans, or other interments. If you are worried about sticking, you can throw down some parchment paper. Pour the batter in to the pan. Evenly spread out the batter, this is not as liquid-y as most cake batters, and it needs to be evened out.
Throw it in the oven for 40-50 minutes. This cake is going to brown and get crispy on the outside. It is ok if it is brown. Don't go for black, but a healthy brown color is great. Remove the cake from the oven let cool for a little bit, and remove to rack to continue cooling.
While your cake is baking you can prepare your strawberries and filling. Wash the berries, remove the stems, cut in to quarter pieces. Put the berries in to a large bowl. Add a handful of sugar, toss the berries around for a bit. Let this sit. As it sits the cut berries will let out some juice, this will then mix with the sugar making a nice syrup. After a little mash up the berries with a fork or potato masher. You need to break the berry down a but, not puree it. Add another handful of sugar. Let this sit for some more time. When I say sit, I mean 20-50 minutes, you want them to let off as much water as you can.
In a mixer cream together the cream cheese, butter and vanilla. Once well mixed add some powdered sugar, not all of it though. Mix well. If the frosting is to liquidy, add some more sugar. If the frosting is too thick add some milk. Whenever you add anything make sure to mix everything really well. It is easy to go too far in one direction. Once you get the right consistency, put the frosting in the fridge.
By this point everything should be done, and cool. Transfer one cake to your serving tray. Poke a bunch of holes in the cake with a fork, this will aid in getting the strawberry juice soaked in to the cake. If you are cutting a cake in half, just make sure to have the raw cake side up. Spoon out half of the strawberries, with syrup on to the cake. Spread out evenly. Apply a decent layer of frosting. Just enough to cover the berries.
| Part way through construction. |
Add the second cake, and repeat with poking the top with a fork, adding strawberries, and a layer of frosting. This time be careful as this will be the final covering. Continue to frost around the edges. You are looking to cover, and encase the berries in the frosting, but it is ok to have some poking out.
You are now ready to enjoy!
I was going to cut this one in to an M, but it was about 10:30PM when I got the top layer done. With frosting running low and patience thin, I just finished the side frosting and called it good. This meant that there was plenty of extra cake.
It was really well received. Marissa loved it, all of my coworkers said it was the best thing I have made yet. Dang... I can't use box cake mixes anymore....
| I forgot to take a picture before other people got to it. |
Sunday, April 22, 2012
Italian Knot Cookies
Another request. Marissa asked if I could make these. They turned out great. These are more or less a sugar cookie with a Anise frosting (this could easily be switched out for any flavoring).
Based on this recipe.
Italian Knot Cookies
Cookie:
1 Cup (8 oz) cream cheese
1/2 Cup (4 oz) butter
1 cup sugar
4 eggs
2 teaspoons vanilla
5 teaspoons baking powder
5 cups flour
Icing:
2 cups Powdered Sugar
3-4 tablespoons of milk
1/2 teaspoon Anise extract
Hundreds and Thousands (aka Sprinkles)
Makes a (insert whatever expletive you think is appropriate) ton.
Prep: 30 mins to 2 hours
Cooking: 6 mins per batch.
So these cookies are hand formed, so you can make them as big as you want, or tiny like I did. I know my audience, so I tend to make small finger cookies, not big ones. After 50 mins of hand rolling and 'tie-ing' a hole bunch of cookies, I started experimenting with shape and size. You can make 2 dozen huge ones or a whole bunch of small ones. It is up to you, and your hands.
You can do this in a mixer, I chose this time to hand mix it. Throw in softened butter and cream cheese, add sugar and beat until smooth and fluffy. Add eggs and vanilla. In a separate bowl combine flour and baking powder. Slowly add flour mix to above batter. This will start to form a dough that gets really hard to 'stir.' Remove and kneed in remaining flour until workable. Mound all of this in one big ball right next to your work surface.
Pull out an ungreased cookie sheet. Now get ready to tie. Grab some dough, roll between your hands (you will need to get flour on them to keep the dough from sticking to your hands) and roll/tie in to knots. Or whatever else you want. If you don't want to deal with knotting you can just twist them in to little spirals too.
Once you have a pan ready, throw it in the over for a short amount of time. You are just lightly baking them. You only want the bottom to turn brown. In my oven, I just cooked them for 6 minutes. If you have big ones, go a little longer. This takes a little modification per batch. You can figure it out.
Remove from pan, cool on racks.
When cooling, get ready to frost them. Combine all the frosting things together, milk last, only little bits at a time. It is really easy to make it too runny. If you need it thicker add more sugar, if it is too thick add some milk.
Dip each cookie in the frosting, place on wax paper. Sprinkle with hundreds and thousands. (not to be confused with jimmies or sprinkles). Eat. Enjoy!
After being introduced to the word 'jimmy' in Pittsburgh, I have looked in to the naming convention of sprinkle-able items. Look it up.
These reminded me of those little frosted animal cookies, the pink and white ones.
Based on this recipe.
Italian Knot Cookies
Cookie:
1 Cup (8 oz) cream cheese
1/2 Cup (4 oz) butter
1 cup sugar
4 eggs
2 teaspoons vanilla
5 teaspoons baking powder
5 cups flour
Icing:
2 cups Powdered Sugar
3-4 tablespoons of milk
1/2 teaspoon Anise extract
Hundreds and Thousands (aka Sprinkles)
Makes a (insert whatever expletive you think is appropriate) ton.
Prep: 30 mins to 2 hours
Cooking: 6 mins per batch.
So these cookies are hand formed, so you can make them as big as you want, or tiny like I did. I know my audience, so I tend to make small finger cookies, not big ones. After 50 mins of hand rolling and 'tie-ing' a hole bunch of cookies, I started experimenting with shape and size. You can make 2 dozen huge ones or a whole bunch of small ones. It is up to you, and your hands.
You can do this in a mixer, I chose this time to hand mix it. Throw in softened butter and cream cheese, add sugar and beat until smooth and fluffy. Add eggs and vanilla. In a separate bowl combine flour and baking powder. Slowly add flour mix to above batter. This will start to form a dough that gets really hard to 'stir.' Remove and kneed in remaining flour until workable. Mound all of this in one big ball right next to your work surface.
Pull out an ungreased cookie sheet. Now get ready to tie. Grab some dough, roll between your hands (you will need to get flour on them to keep the dough from sticking to your hands) and roll/tie in to knots. Or whatever else you want. If you don't want to deal with knotting you can just twist them in to little spirals too.
Once you have a pan ready, throw it in the over for a short amount of time. You are just lightly baking them. You only want the bottom to turn brown. In my oven, I just cooked them for 6 minutes. If you have big ones, go a little longer. This takes a little modification per batch. You can figure it out.
Remove from pan, cool on racks.
When cooling, get ready to frost them. Combine all the frosting things together, milk last, only little bits at a time. It is really easy to make it too runny. If you need it thicker add more sugar, if it is too thick add some milk.
Dip each cookie in the frosting, place on wax paper. Sprinkle with hundreds and thousands. (not to be confused with jimmies or sprinkles). Eat. Enjoy!
After being introduced to the word 'jimmy' in Pittsburgh, I have looked in to the naming convention of sprinkle-able items. Look it up.
These reminded me of those little frosted animal cookies, the pink and white ones.
Sunday, March 25, 2012
Wes' Chilean Pineapple Cake
So Wes' birthday was earlier this week. You know what that means... I get to make a cake! This time I wanted to be a little adventurous so I asked Wes what his favorite cake was. He told me about this mythical cake that he would have when he was studying in Chile. A quick google search got us to here which is the base of this recipe. This is one of the more interesting things I have baked, it was a lot of fun, but took a long time. A good evening was devoted to this.
Chilean Pineapple Cake
cake:
6 eggs (whites separated from yokes)
1 cup sugar
3/4 cup flour
3/4 cup cornstarch
2 tsp. baking powder
filling:
1 fresh pineapple
1 can pineapple juice
1/6 cup Coconut Vodka (really any liquor you want... pair it with pineapple)
1 quart heavy whipping cream (2 pints for those of you (like me) who would need to look that up)
3/4 cup powder sugar
Coconut Flakes.
Before we start I am going to let it be known that I made two of these cakes. So if for some reason you are trying to make this exact cake, you are going to need to double the above.
First up: in a small sauce pan, add sugar and get it a little wet (1-2 tablespoons, this is not very exact). Heat this on medium low heat until sugar turns in to a homogenous liquid.
While this is going on beat the egg whites until stiff. If you have never done this: You really do not want to do this by hand. You need to make sure you do this in a really dry bowl, any amount of water can throw this whole process off. Beat the heck out of the eggs. If you are using a mixer you should be up in the 8 - 10 range (out of 13). When you are done, when you lift a fork out of the liquid, it should look really thick and stable. Add the melted sugar (while it is still hot and liquidy) to the whites, beat well.
At this point turn on your mixer to beat (8-10) and slowly add the egg yokes. Be sure each one is incorporated before you add the next.
In a separate bowl add the rest of the ingredients. Sift/mix/shake until everything is well mixed, then slowly beat in to egg mixture. Now you are ready to pour all of this in to a greased pan you are going to make this in. Don't worry, this batter rises a lot. Like a lot a lot. Double at least. Throw that bad boy in to the oven for 30 mins at 350 degrees.
Now while this is baking, you can start preparing the filling. Cut up your pineapple. This was the first time I have ever, personally, demolished a pineapple. First thing I did... put a slice in my mouth. Dang that hurt. Turns out pineapple is a citrus fruit and is often used as a meat tenderizer. I didn't. But my tongue found out. Anyway, slice really thin, as thin as possible. We don't want any of the outside roughage, and we don't want any of the core. If you are hardcore, you can squeeze all of the juice out of the outside and core, we are going to need juice later.
At this point, look out your window and see the flock of wild turkeys wandering around...
Back to work! Set all of the pineapple stuff aside. Mix together the liquid that is going to make this cake great. Take a large amount of pineapple juice (12-20 oz) and add some Vodka. Mix well and set aside.
To prepare the cream filling, it is suggested that you refrigerate the bowl and beaters you are going to use. I am sure this will help it set nicely, but I didn't know this, so I skipped this step. Pour in your heavy cream, and set your mixer as high as it can go. If you have one like mine you will get milk spray. But pound though it, because after a minute or two you will be the most beautiful looking cream you have seen. Mix in the powdered sugar to make it taste even better. Set the entire thing in the fridge until the cake is ready.
When the cake is down let it cool a bit, then start slicing. This is a layered cake, so you want it to have as many layers as you can get out of it. I ended up slicing each one in half because of the size of my cake.
We are going to be pouring the pineapple vodka liquid all over this thing, so slice the top layer to aid in the absorption of the liquid.
Now we are ready to start assembling. Put first layer down. Sprinkle pineapple liquid all over the layer, getting everything soaked. Not dripping, but certainly moist. The more liquid you can fit in, the more flavor this cake will have. Once you are happy with the liquid content of the layer, throw down a few dollops of cream and spread.
Then add a layer of pineapples:
Then add another few dollops of cream on the pineapple layer. Now, take the next layer of cake and turn it upside down, sprinkle with pineapple liquid, and return upright, place on top of previous layer. Continue this until you have no more layers.
This is where our paths will diverge a little. From here on out all you are doing is frosting and decorating. Cover your creation with cream. Garnish with pineapples and sprinkle the whole thing with coconut.
But for me, I had to make this thing in to a 'W'
Everyone loved it. It was great! I had fun making it. Wes said that it was really close to what he remembers. It turn out to be a really nice and light cake with a great flavor from the pineapple.
Only done side, it gets kind of weird after two days of sitting in the fridge, I would suggest consuming within a few days of construction.
Chilean Pineapple Cake
cake:
6 eggs (whites separated from yokes)
1 cup sugar
3/4 cup flour
3/4 cup cornstarch
2 tsp. baking powder
filling:
1 fresh pineapple
1 can pineapple juice
1/6 cup Coconut Vodka (really any liquor you want... pair it with pineapple)
1 quart heavy whipping cream (2 pints for those of you (like me) who would need to look that up)
3/4 cup powder sugar
Coconut Flakes.
Before we start I am going to let it be known that I made two of these cakes. So if for some reason you are trying to make this exact cake, you are going to need to double the above.
First up: in a small sauce pan, add sugar and get it a little wet (1-2 tablespoons, this is not very exact). Heat this on medium low heat until sugar turns in to a homogenous liquid.
| You kind of want to taste it... but then you realize it is just sugar. |
| A sighting of the elusive Big Foot of the Coat Factory. Also there be stiff egg whites. |
In a separate bowl add the rest of the ingredients. Sift/mix/shake until everything is well mixed, then slowly beat in to egg mixture. Now you are ready to pour all of this in to a greased pan you are going to make this in. Don't worry, this batter rises a lot. Like a lot a lot. Double at least. Throw that bad boy in to the oven for 30 mins at 350 degrees.
Now while this is baking, you can start preparing the filling. Cut up your pineapple. This was the first time I have ever, personally, demolished a pineapple. First thing I did... put a slice in my mouth. Dang that hurt. Turns out pineapple is a citrus fruit and is often used as a meat tenderizer. I didn't. But my tongue found out. Anyway, slice really thin, as thin as possible. We don't want any of the outside roughage, and we don't want any of the core. If you are hardcore, you can squeeze all of the juice out of the outside and core, we are going to need juice later.
At this point, look out your window and see the flock of wild turkeys wandering around...
| Right outside my window. |
| I used juice from a can of pineapples, I needed more than I could get. |
To prepare the cream filling, it is suggested that you refrigerate the bowl and beaters you are going to use. I am sure this will help it set nicely, but I didn't know this, so I skipped this step. Pour in your heavy cream, and set your mixer as high as it can go. If you have one like mine you will get milk spray. But pound though it, because after a minute or two you will be the most beautiful looking cream you have seen. Mix in the powdered sugar to make it taste even better. Set the entire thing in the fridge until the cake is ready.
When the cake is down let it cool a bit, then start slicing. This is a layered cake, so you want it to have as many layers as you can get out of it. I ended up slicing each one in half because of the size of my cake.
| Right out of the oven |
Now we are ready to start assembling. Put first layer down. Sprinkle pineapple liquid all over the layer, getting everything soaked. Not dripping, but certainly moist. The more liquid you can fit in, the more flavor this cake will have. Once you are happy with the liquid content of the layer, throw down a few dollops of cream and spread.
Then add a layer of pineapples:
| Don't you just love my serving plate. |
This is where our paths will diverge a little. From here on out all you are doing is frosting and decorating. Cover your creation with cream. Garnish with pineapples and sprinkle the whole thing with coconut.
But for me, I had to make this thing in to a 'W'
| Look at all those extra... what am I going to do with those. |
| mmmmm.... layers. |
| Finished product. |
Only done side, it gets kind of weird after two days of sitting in the fridge, I would suggest consuming within a few days of construction.
Sunday Cookies: Toffee Oat Wonders
Installment two of my soon to be weekly cookie experiment, there was generally wonderful feed back from the last cookies, the Mint Chocolate ones... but someone did not really like chocolate. So then I suggested Peanut Butter next time, and turns out someone does not like peanut butter. So I set off in to my cookie book (taste of home:cookies, pg 23 for those following at home) to find a cookie sans chocolate and sans peanut butter that I would like. There were lots of options, but these looked awesome. And turns out they are! Very straight forward (unlike the cake I am about to post) and very tasty.
Toffee Oat Wonders
4 dozen cookies
15 min prep
10-12 min bake @ 375 per batch.
3/4 cup Butter, softened
1 cup packed brown sugar
3/4 cup sugar
2 eggs
3 teaspoons vanilla
2 1/4 cup flour
2 1/4 cup Old-fashioned oats
1 teaspoon baking soda
1 teaspoon baking powder
1/2 teaspoon salt
10 oz. English Toffee Bits **
** here is a little side note that is going to make Gramps get all red in the face. He may even write a strongly worded letter. It could get ugly. The recipe calls for One 10 oz Bag. Turns out all of the toffee bits I could find came in 8 oz bags. Then I looked around an all of the chocolate chips and whatnot were all in smaller sizes. So now we have to either resize our recipes, buy two bags of chips, or deal with a shortchange. I would much rather pay the 50 cents extra and outright know they have raised prices then have a false sense of price consistency. This is food inflation, and I want none of it.
Anyway... back to the cookies. Cream butter and sugars in a bowl until they are all smooth. Add eggs one at a time, mix well. If you are doing this by hand (I was) be sure to get everything really well mixed, this will prevent lumps later on. Beat in vanilla. Set this aside.
In a different bowl mix everything minus the toffee bits together until well incorporated. Then slowly mix the dry bowl in to the creamed mixture. Once all of this is well mixed, toss in your toffee. Mix well.
Scoop a tablespoon size amount of batter and roll in to a ball, place on an ungreased cookie sheet. Give the balls lots of room to breathe (I managed 13 on each sheet). Bake for 10-12 minutes at 375, or until just turning brown on the edges. Remove from oven, let cool, then place on wire rack. Then consume and be happy.
Toffee Oat Wonders
4 dozen cookies
15 min prep
10-12 min bake @ 375 per batch.
3/4 cup Butter, softened
1 cup packed brown sugar
3/4 cup sugar
2 eggs
3 teaspoons vanilla
2 1/4 cup flour
2 1/4 cup Old-fashioned oats
1 teaspoon baking soda
1 teaspoon baking powder
1/2 teaspoon salt
10 oz. English Toffee Bits **
** here is a little side note that is going to make Gramps get all red in the face. He may even write a strongly worded letter. It could get ugly. The recipe calls for One 10 oz Bag. Turns out all of the toffee bits I could find came in 8 oz bags. Then I looked around an all of the chocolate chips and whatnot were all in smaller sizes. So now we have to either resize our recipes, buy two bags of chips, or deal with a shortchange. I would much rather pay the 50 cents extra and outright know they have raised prices then have a false sense of price consistency. This is food inflation, and I want none of it.
Anyway... back to the cookies. Cream butter and sugars in a bowl until they are all smooth. Add eggs one at a time, mix well. If you are doing this by hand (I was) be sure to get everything really well mixed, this will prevent lumps later on. Beat in vanilla. Set this aside.
In a different bowl mix everything minus the toffee bits together until well incorporated. Then slowly mix the dry bowl in to the creamed mixture. Once all of this is well mixed, toss in your toffee. Mix well.
Scoop a tablespoon size amount of batter and roll in to a ball, place on an ungreased cookie sheet. Give the balls lots of room to breathe (I managed 13 on each sheet). Bake for 10-12 minutes at 375, or until just turning brown on the edges. Remove from oven, let cool, then place on wire rack. Then consume and be happy.
| I love cookies... what am I saying! I love food! |
Sunday, January 22, 2012
Breakfast in a Cup
As you all may know I am a fan of muffin tins. Again, this might be because I was living in an apartment that only had muffing tins... hence the creation of bacon cups and Mini Pies. From experimenting with both of these, I wanted to aid in the consumption of bacon in the morning (not that you really need help to do that....).
There is a little effort in preparation, but the good thing is that you can do some of the work ahead of time, and can mass produce these little cups of glory.
Breakfast in a Cup
Aprox Prep: 30 mins
Aprox Cook: 30 mins
Servings: 6
6 strips of Bacon
5 links of Breakfast Sausage
1 Cup Cubed or Shredded Hash browns
5 Eggs
Splash of Milk
1/2 cup Cheese (optional)
Serves: 6
Note about amount: You need one strip of bacon for every cup you want to make. Everything else is relative... You can also leave out the sausage, hash browns and/or the cheese. You can use other meat too... any type of sausage or more bacon.
So first up cook the sausage. Either before or after cut in to small chunks. This is something you can do ahead of time and then refrigerate or freeze. At the same time start cooking up the potatoes. You also might want to spray the muffin pan with some cooking spray.
In either the old sausage pan or a new pan start cooking the bacon. You are going to cook the bacon till it is just done. Just when it gets to that floppy soft bacon that I hate.... don't worry, if you like crispy bacon it will cook some more in the oven.
Remove the bacon from the pan and pat dry with a paper towel. Very
quickly, as in as soon as your fingers can handle the hot bacon grease,
line the edges of each muffin hole with a strip of bacon. Try to press
in to the shape of the cup, it will not be perfect, it is ok. When you
add the other stuff it will fill out.
Once the hash browns are cooked to your likeness (I like them well done) spoon a generous layer in to each cup.
Add two or three sausage pieces to every cup.
In a large mixing bowl crack all of the eggs and add 1/4 - 1/3 cup of milk, mix well with a fork or whisk. You want this to be a homogeneous mixture, no eggy lumps. Shortly after mixing, pour egg mixture in to cups, try to keep the egg on the inside of the bacon. It is ok if the egg fills up between the bacon and the pan. Fill up to about the level of the top of the bacon.
Throw the whole thing in to the oven at 350 degrees. Let it bake for 12-15 minutes or until the egg has just about set. Sprinkle cheese on to top of the cups and return to oven for 4-6 minutes or until melted.
Remove from pan and enjoy!
So the next experiment is to use pancake batter instead of egg. This would be for the people who cannot stand eggs (silly people). Anyway, have fun with muffin pans! Enjoy the little cups!
There is a little effort in preparation, but the good thing is that you can do some of the work ahead of time, and can mass produce these little cups of glory.
Breakfast in a Cup
Aprox Prep: 30 mins
Aprox Cook: 30 mins
Servings: 6
6 strips of Bacon
5 links of Breakfast Sausage
1 Cup Cubed or Shredded Hash browns
5 Eggs
Splash of Milk
1/2 cup Cheese (optional)
Serves: 6
Note about amount: You need one strip of bacon for every cup you want to make. Everything else is relative... You can also leave out the sausage, hash browns and/or the cheese. You can use other meat too... any type of sausage or more bacon.
So first up cook the sausage. Either before or after cut in to small chunks. This is something you can do ahead of time and then refrigerate or freeze. At the same time start cooking up the potatoes. You also might want to spray the muffin pan with some cooking spray.
In either the old sausage pan or a new pan start cooking the bacon. You are going to cook the bacon till it is just done. Just when it gets to that floppy soft bacon that I hate.... don't worry, if you like crispy bacon it will cook some more in the oven.
| Mmmm..... bacon. (don't cut the bacon like this... ) |
| It is ok if the bacon breaks a little. |
Add two or three sausage pieces to every cup.
| Double up on the pork! |
| Action Shot!!! |
| The Right is bacon-less (we ran out of bacon :( ) |
Throw the whole thing in to the oven at 350 degrees. Let it bake for 12-15 minutes or until the egg has just about set. Sprinkle cheese on to top of the cups and return to oven for 4-6 minutes or until melted.
| I love Cheese. I love Bacon. I love eggs. I love potatoes. I love Sausage. |
| The goods. |
| Bacon-less cups. |
| Bacon Morning Cups. |
Subscribe to:
Posts (Atom)